
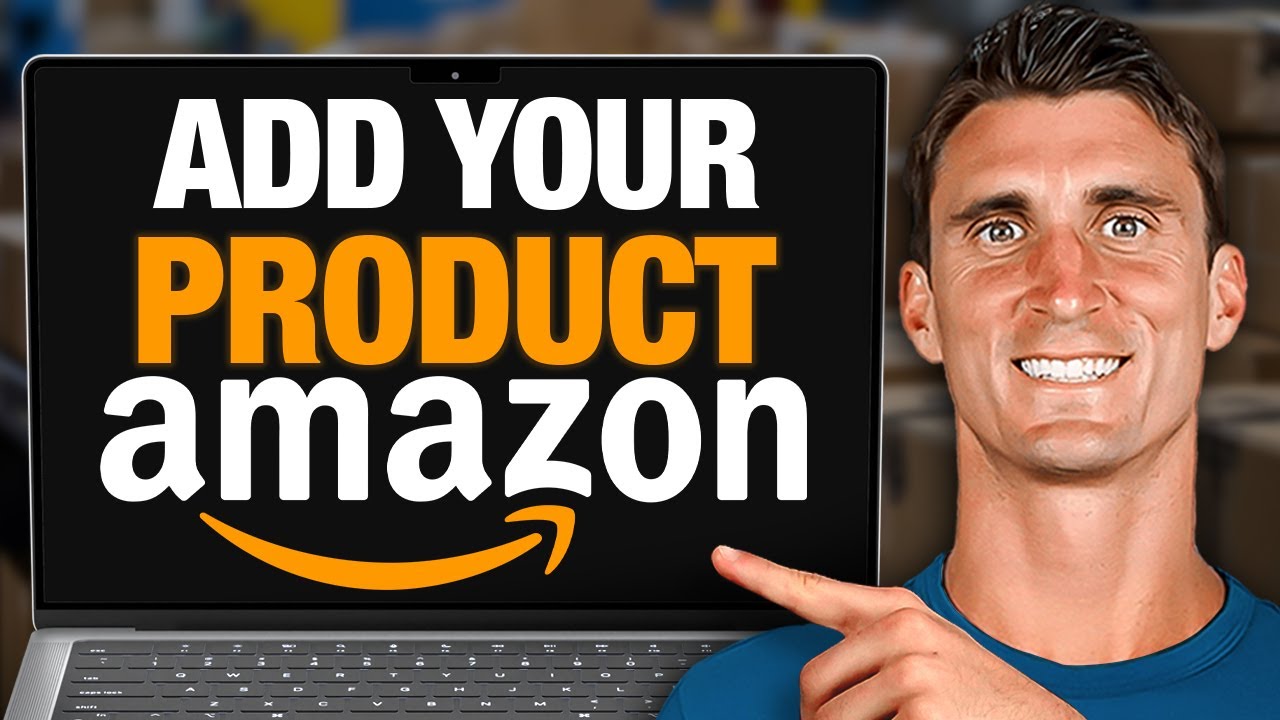
Creating a profitable Amazon listing is one of the most critical skills for e-commerce success, yet your listing quality ultimately determines whether you’ll thrive or watch your inventory collect dust in Amazon’s warehouses. Recently, Travis Marziani demonstrated this process by launching two distinct products in just seven days. He created listings for Clove Tea and Carnivore Pork Rind Breadcrumbs. Throughout this article, you’ll discover the exact strategies he used to create professional listings that compete effectively in their respective markets. Moreover, you’ll learn how the Passion Product Formula approach helps entrepreneurs build sustainable Amazon businesses around products they genuinely care about.
Your Amazon listing serves as your digital storefront, sales representative, and brand ambassador all rolled into one. Customers cannot touch, taste, or try your product before purchasing. Therefore, your listing must communicate value through compelling images, persuasive copy, and strategic keyword optimization. This comprehensive guide covers everything from securing your UPC barcode to optimizing backend search terms using professional tools like Helium 10. Furthermore, you’ll gain insights into the Passion Product Formula methodology, which emphasizes creating products that align with your interests while meeting genuine market demand. Let’s dive into the essential foundation of Amazon fulfillment strategies.
- Understanding Amazon FBA vs. FBM
- The Passion Product Philosophy
- Pre-Listing Essentials: What You Need Before Starting
- Keyword Research: The Foundation of Your Listing
- Creating Your Amazon Listing Step-by-Step
- Advanced Listing Optimization with Helium 10
- Common Listing Mistakes to Avoid
- The Review Process and Going Live
- Why Your Listing Quality Determines Success
- Mastering Your Amazon Launch Strategy
- Frequently Asked Questions
Understanding Amazon FBA vs. FBM
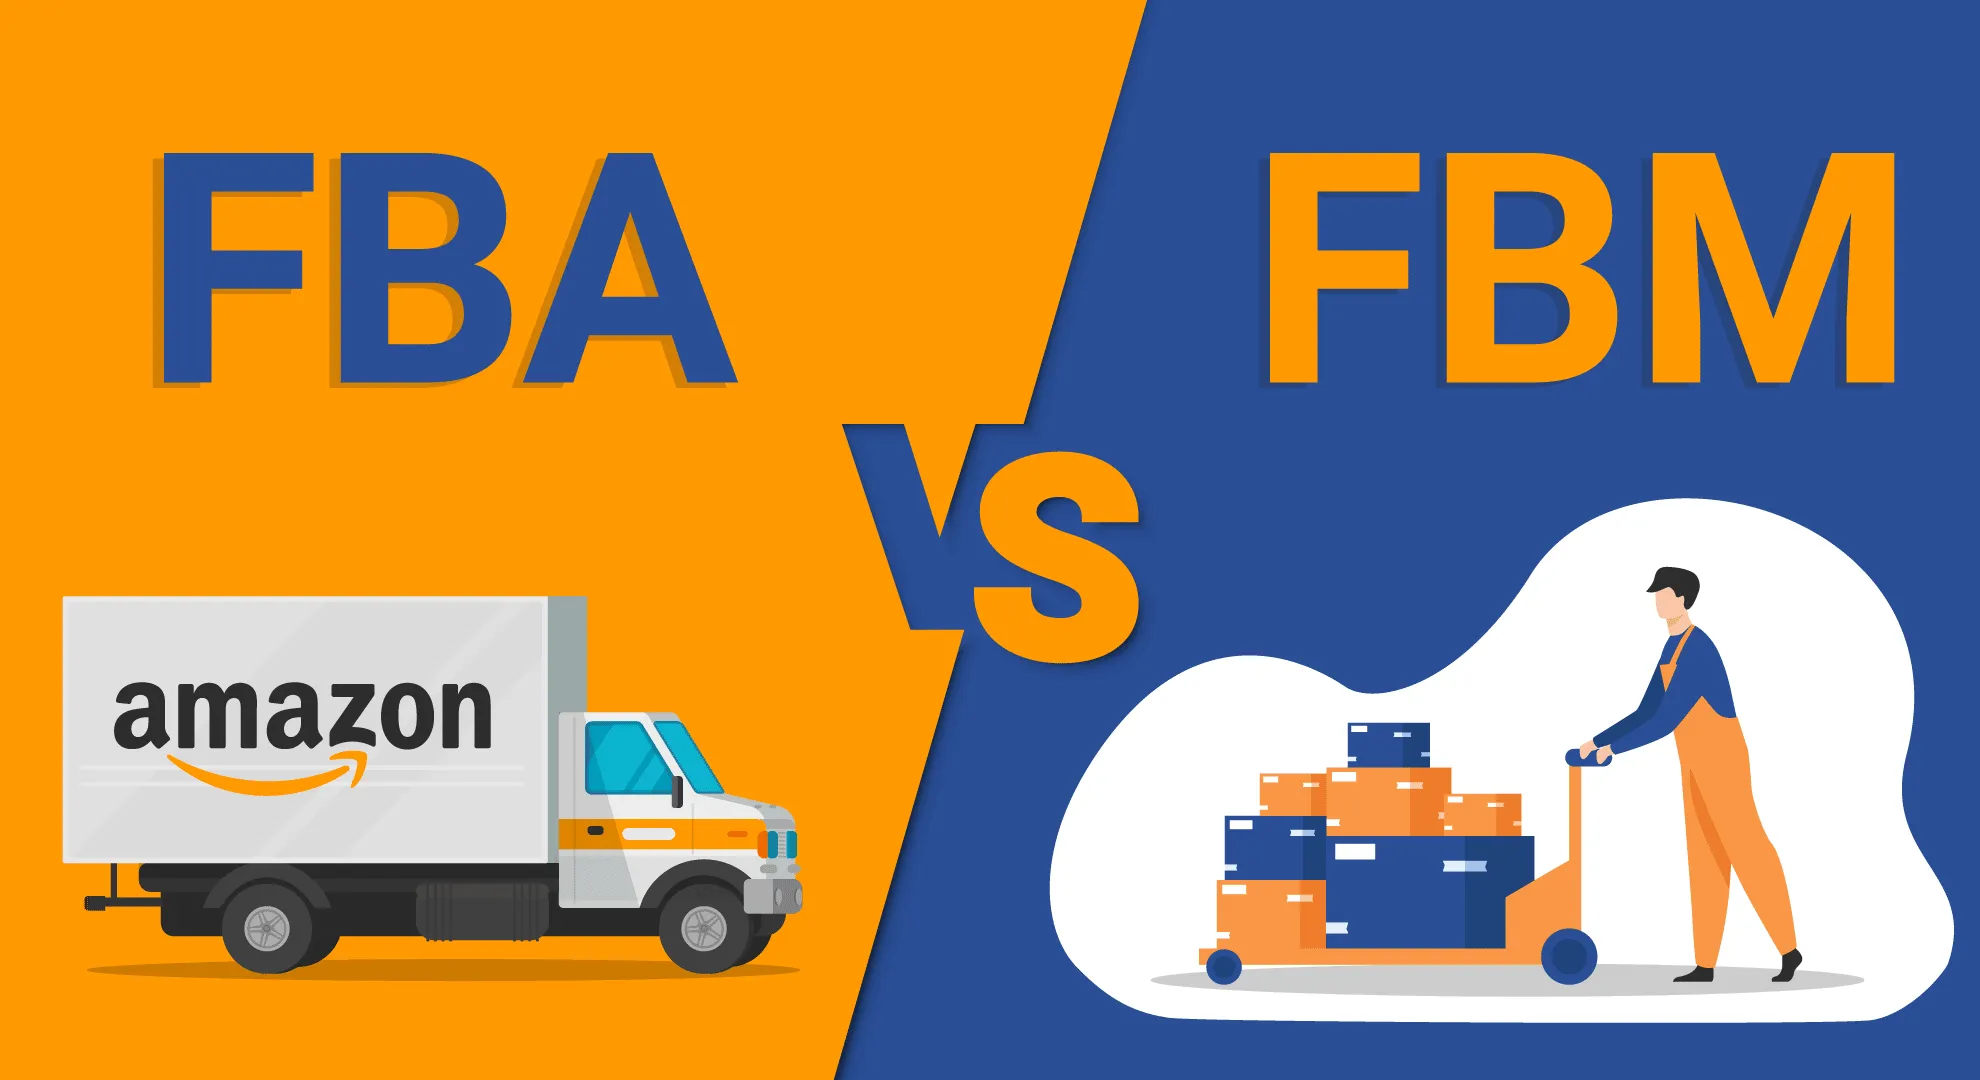
What is FBM (Fulfilled by Merchant)?
Fulfilled by Merchant, commonly known as FBM, means you handle every aspect of order fulfillment yourself. When a customer purchases your product through Amazon’s marketplace, you receive the order notification. Subsequently, you must pick, pack, and ship the item directly to the buyer. This approach gives you complete control over inventory management, packaging quality, and shipping timelines.
FBM offers distinct advantages for entrepreneurs launching new products quickly. For instance, Travis utilized this method to get his Clove Tea product listed within seven days. This bypassed the additional time required to ship inventory to Amazon’s warehouses. Additionally, FBM works exceptionally well for businesses testing new products. It’s ideal for selling low-volume items or managing oversized products. These products often incur high FBA storage fees.
However, FBM requires significant operational commitment on your part. You’ll need to maintain adequate packaging supplies. Furthermore, you must negotiate shipping rates with carriers like USPS, UPS, or FedEx. Additionally, you’ll dedicate time daily to process orders. Beyond that, you’ll handle all customer service inquiries, returns, and potential shipping issues. Unfortunately, you won’t have Amazon’s support infrastructure backing you up.
Despite these challenges, FBM provides an excellent starting point for new sellers. You can launch products immediately and gather initial customer feedback. This validates market demand before investing in bulk inventory shipments to Amazon’s fulfillment centers. Consequently, many successful Amazon sellers start with FBM. They transition to FBA as their sales volume increases.
What is FBA (Fulfilled by Amazon)?

Fulfilled by Amazon transforms your business operations completely. It outsources storage, shipping, and customer service to Amazon’s world-class logistics network. You simply send your inventory to designated Amazon warehouses. After that, their system handles everything else. When customers in Texas, New York, or anywhere across the country place orders, Amazon handles it all. They automatically pick, pack, and ship your products from the nearest fulfillment center.
This scalability represents FBA’s most compelling advantage. For example, imagine receiving one hundred sales in a single day. With FBA, you don’t lift a finger beyond monitoring your inventory levels. Amazon’s sophisticated distribution network ensures fast delivery times. They often offer Prime two-day shipping to millions of subscribers. Moreover, products fulfilled by Amazon typically rank higher in search results. They win the coveted Buy Box more frequently than FBM listings.
FBA also enhances your brand’s credibility significantly. The Prime badge signals reliability and fast shipping to customers. As a result, this directly impacts conversion rates. Additionally, Amazon handles all customer service inquiries. They process returns according to their standardized policies. They also manage the complex logistics of reverse shipping. This support allows you to focus on product development, marketing, and business growth. Therefore, you won’t get bogged down in operational minutiae.
Nevertheless, FBA requires careful planning and upfront investment. You’ll need to ship products to Amazon’s warehouses. This process takes several weeks for processing and distribution across their fulfillment network. Furthermore, Amazon charges storage fees based on cubic footage and time of year. They impose higher rates during Q4 holiday seasons. Despite these considerations, most successful Amazon sellers ultimately choose FBA. They appreciate its unmatched scalability and operational efficiency.
Choosing Your Fulfillment Strategy
Starting with FBM while planning your transition to FBA represents the smartest approach for most new sellers. This hybrid strategy allows you to launch quickly and start generating sales. Simultaneously, you can prepare larger inventory orders for Amazon’s fulfillment centers. Travis specifically chose this path for his Clove Tea launch. He recognized that waiting for FBA processing would delay his seven-day challenge timeline.
Your initial FBM period serves multiple strategic purposes beyond speed to market. First, you’ll gather authentic customer feedback. This helps refine your product, packaging, and listing optimization. Second, you’ll validate actual demand levels. Consequently, you won’t commit to minimum order quantities until you’re sure. These quantities are typically required for cost-effective FBA shipments. Third, you’ll generate early sales velocity and reviews. These boost your ranking when you eventually transition to FBA.
Plan your FBA transition carefully by monitoring your daily sales volume. Calculate your break-even points accurately. Once you’re consistently selling enough units, you can justify bulk inventory purchases and FBA fees. At that point, initiate the process of creating shipment plans in Seller Central. Additionally, consider maintaining some FBM inventory during the transition. This prevents stockouts that could tank your hard-earned search rankings.
The timeline for this transition varies based on your product category and sales velocity. For example, some sellers switch within their first month. Others operate FBM for several months while building capital. Regardless of your timeline, understanding both fulfillment methods empowers you. You can make strategic decisions that align with your business goals and resource constraints.
The Passion Product Philosophy

Why Private Label Beats Retail Arbitrage
Private label selling fundamentally differs from retail arbitrage and wholesale models. The difference shows up in profitability and sustainability. Retail arbitrage involves buying discounted products from stores like Walmart or Target. Subsequently, you resell them on Amazon at markup. While this method generates quick cash flow, it has limitations. You’re constantly hunting for deals and competing on price. Countless other resellers chase the same opportunities.
Wholesale approaches offer slightly better margins. You purchase products in bulk directly from manufacturers or distributors. However, you still lack control over branding, pricing, and product differentiation. Furthermore, you’re competing on identical listings with other wholesale sellers. This inevitably drives prices down and erodes profit margins over time.
In contrast, private label transforms you from a reseller into a brand owner. You now have exclusive products. You source generic products from manufacturers and add your unique branding and packaging. Then, you create proprietary listings that you alone control. This exclusivity eliminates direct price competition. It allows you to build brand equity that appreciates over time. Moreover, private label products typically command 30-50% higher profit margins. They outperform arbitrage or wholesale models significantly.
The Passion Product Formula elevates standard private label even further. It encourages you to improve products meaningfully. Rather than simply slapping your logo on generic items, you do more. You identify opportunities to enhance quality, add features, or target underserved market segments. As a result, this approach creates genuine competitive advantages. These translate into customer loyalty, higher conversion rates, and sustainable business growth.
Creating Products You’re Passionate About

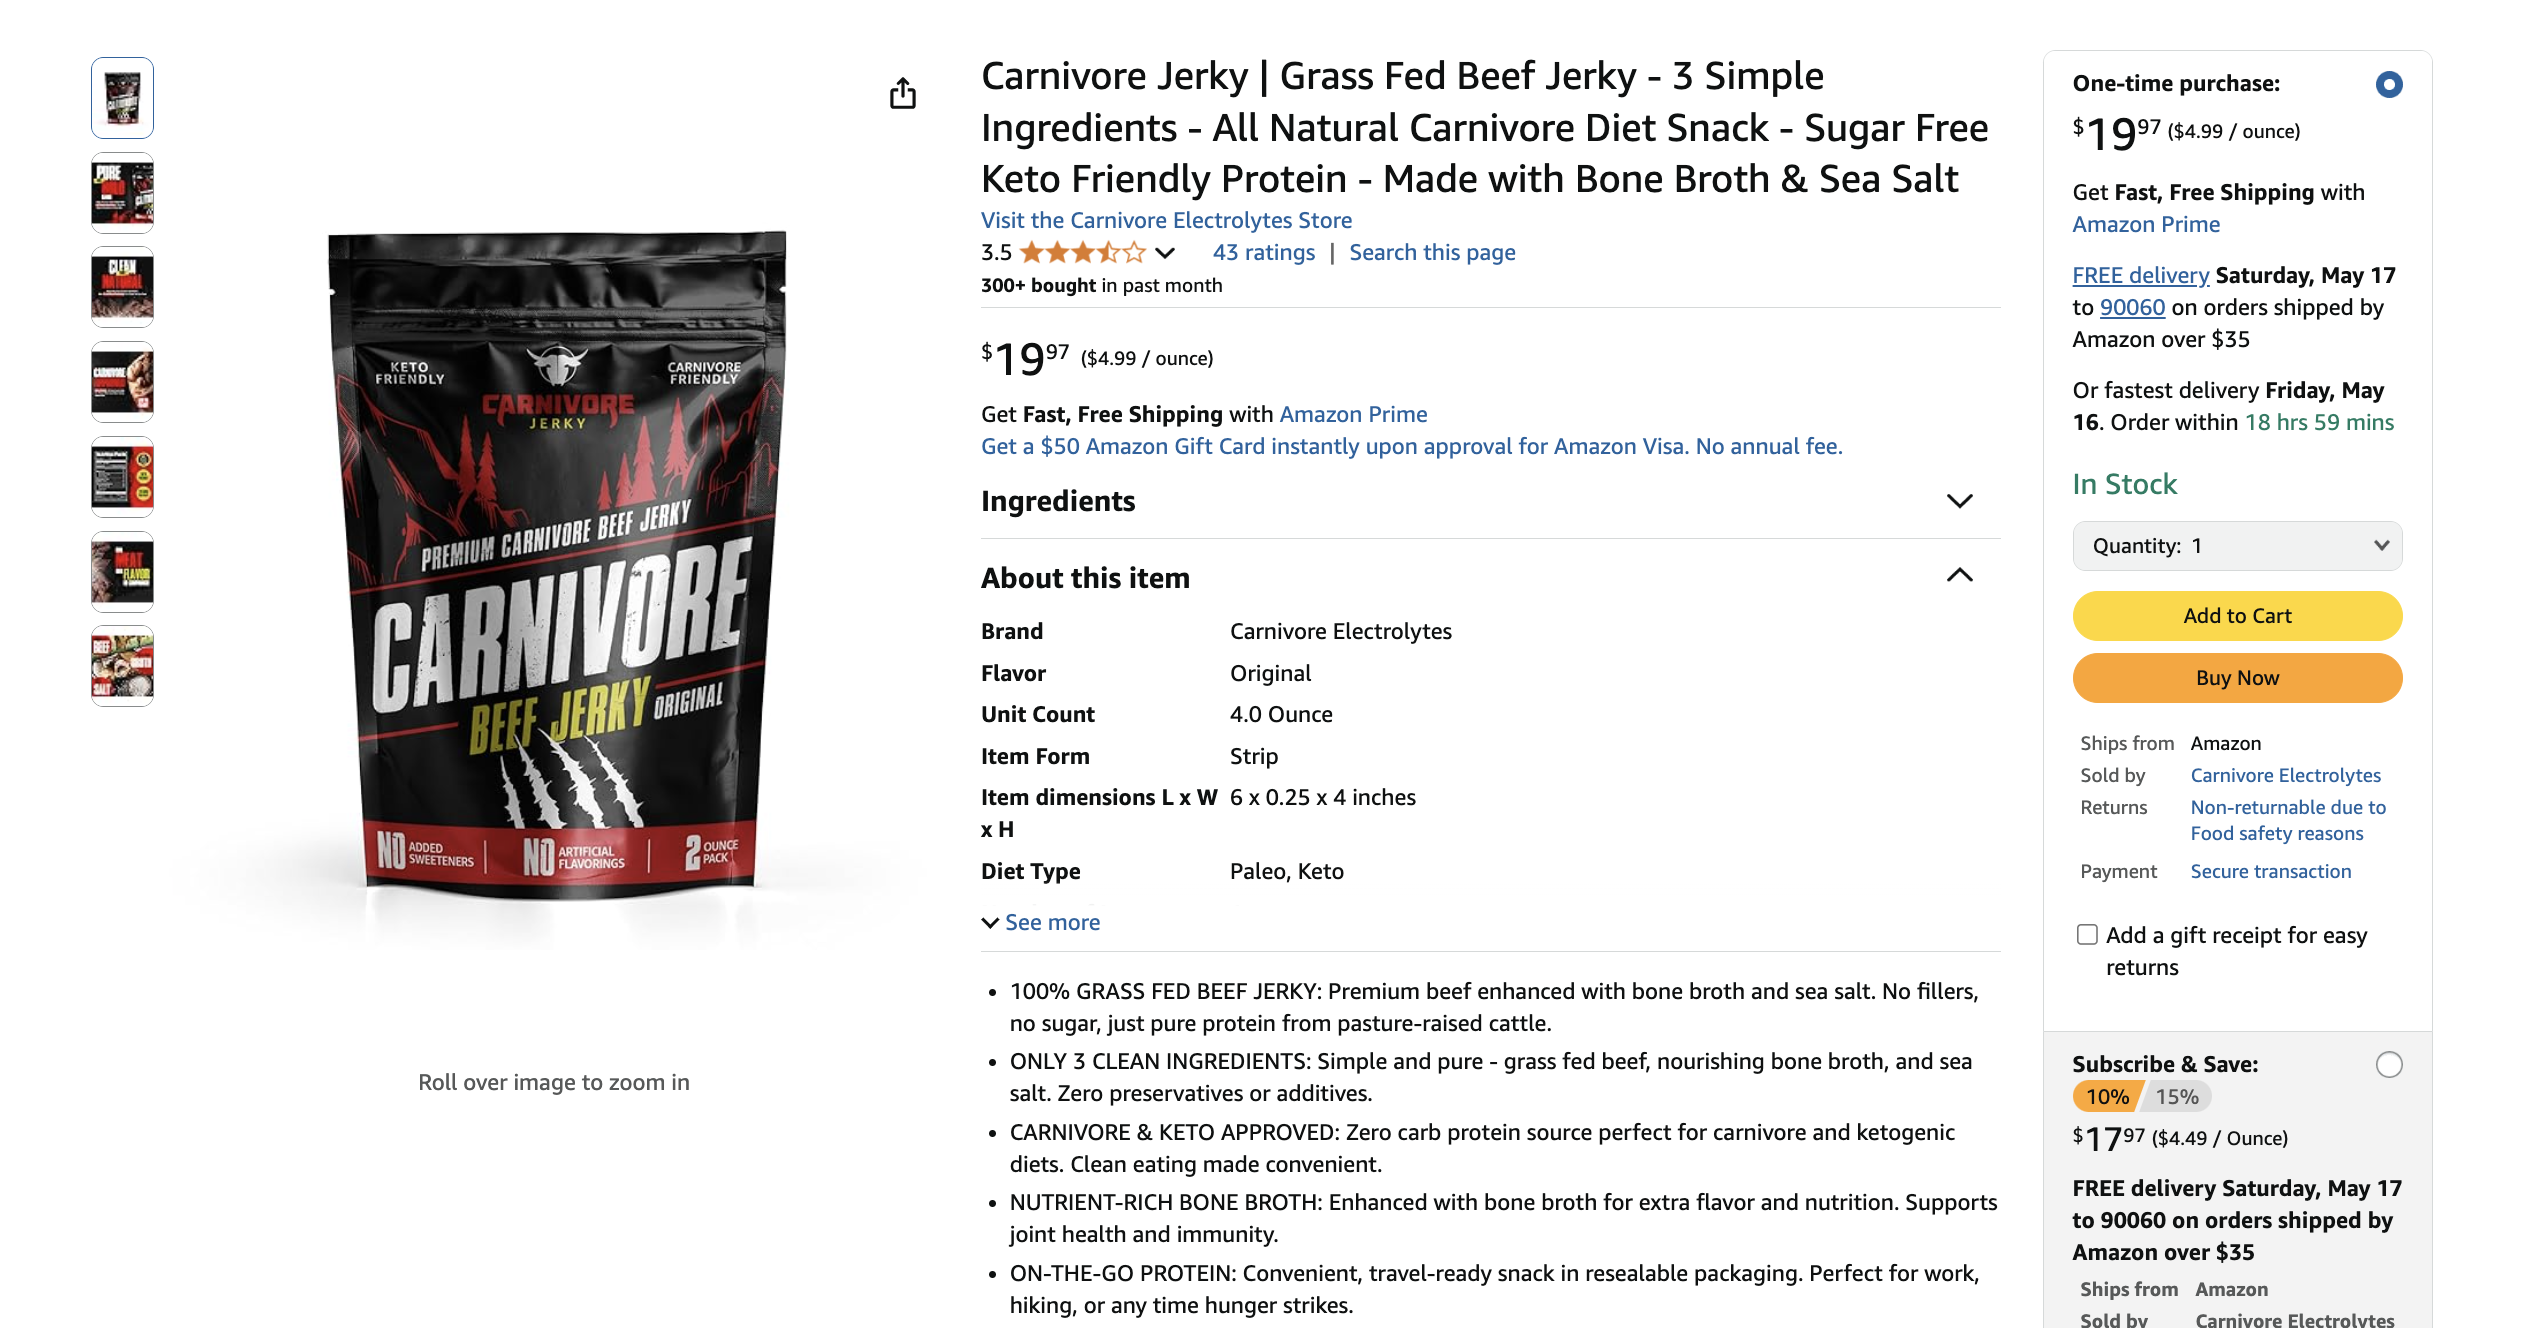
Travis’s Carnivore Jerky exemplifies the Passion Product philosophy perfectly. The beef jerky market seems saturated with hundreds of competing brands. Nevertheless, he identified an opportunity by targeting the specific carnivore diet community. By branding specifically for this passionate niche, his product achieved remarkable results. It now ranks number one when customers search “carnivore jerky.” This happened despite competing against established national brands.
This success stems from aligning product development with genuine market passion. The carnivore diet community actively seeks products that fit their strict nutritional requirements. They appreciate brands that understand their lifestyle. Consequently, Travis created a jerky formulation with minimal ingredients and no added sugars. His messaging speaks directly to carnivore dieters’ values and needs.
Your passion for a product category provides invaluable advantages throughout the business lifecycle. You’ll naturally understand customer pain points and anticipate questions. Furthermore, you’ll identify improvement opportunities that generic sellers overlook. Additionally, your enthusiasm translates into more compelling marketing copy. You’ll provide better customer service and create authentic brand messaging. This messaging resonates with your target audience.
Finding your passion product requires honest self-reflection. Think about your interests, hobbies, and lifestyle. Perhaps you’re into fitness, cooking, pet care, outdoor activities, or home organization. Whatever genuinely excites you represents potential product categories worth exploring. Furthermore, your existing knowledge accelerates the learning curve. It helps you make informed decisions about product development, sourcing, and positioning.
Improving Existing Products
Simply rebranding generic products no longer suffices in today’s competitive Amazon marketplace. Customers have endless options and sophisticated evaluation criteria. This makes meaningful differentiation essential for success. The Passion Product Formula emphasizes finding ways to enhance existing products. You don’t need to create revolutionary inventions from scratch.
Improvements can take many forms depending on your product category. For instance, you might upgrade materials using organic cotton instead of polyester. Alternatively, you could choose stainless steel instead of plastic. You could modify sizing or adjust formulations. You might bundle complementary items or simply improve packaging. Even small enhancements that address common customer complaints create competitive advantages. These improvements are worth marketing.
Travis’s approach with both Clove Tea and Carnivore Pork Rind Breadcrumbs demonstrates this principle effectively. Neither product represents groundbreaking innovation. However, both target specific customer avatars with tailored positioning. The pork rind breadcrumbs specifically appeal to carnivore and keto dieters. They’re seeking grain-free alternatives. Meanwhile, the clove tea targets health-conscious consumers interested in natural wellness remedies.
Research competitor reviews meticulously to identify improvement opportunities. Customers openly share frustrations in their reviews. They complain about packaging issues, quality concerns, missing features, and unmet expectations. These complaints represent your product development roadmap. Subsequently, address these pain points in your product design. Highlight improvements in your listing. This creates powerful differentiation that drives conversions and builds customer loyalty.
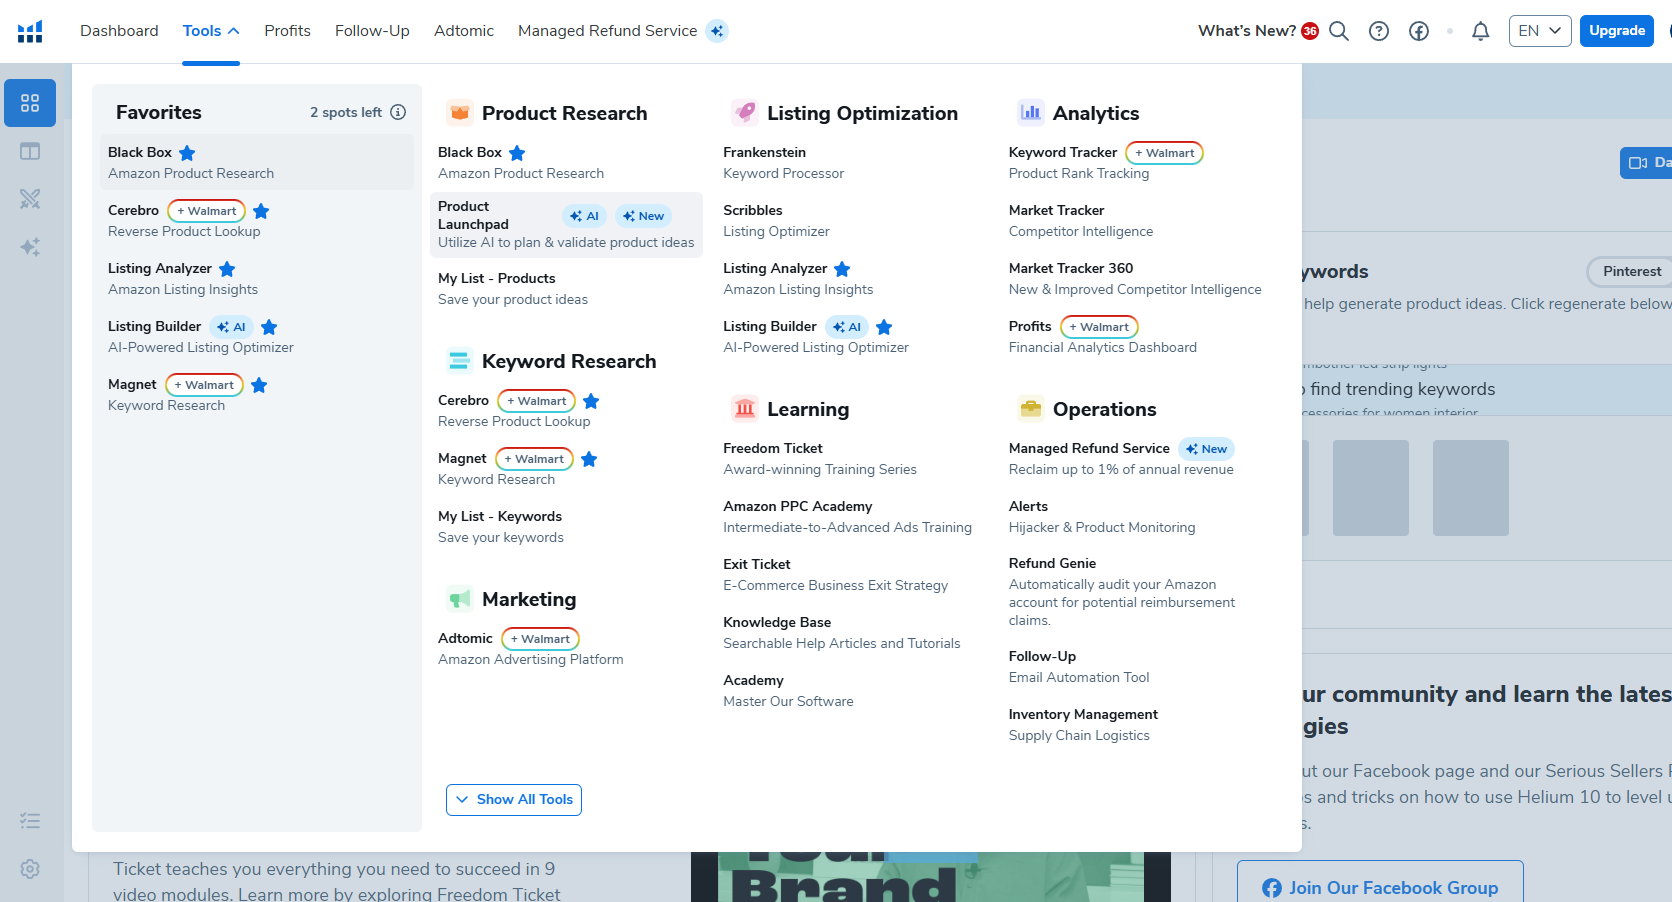
Pre-Listing Essentials: What You Need Before Starting
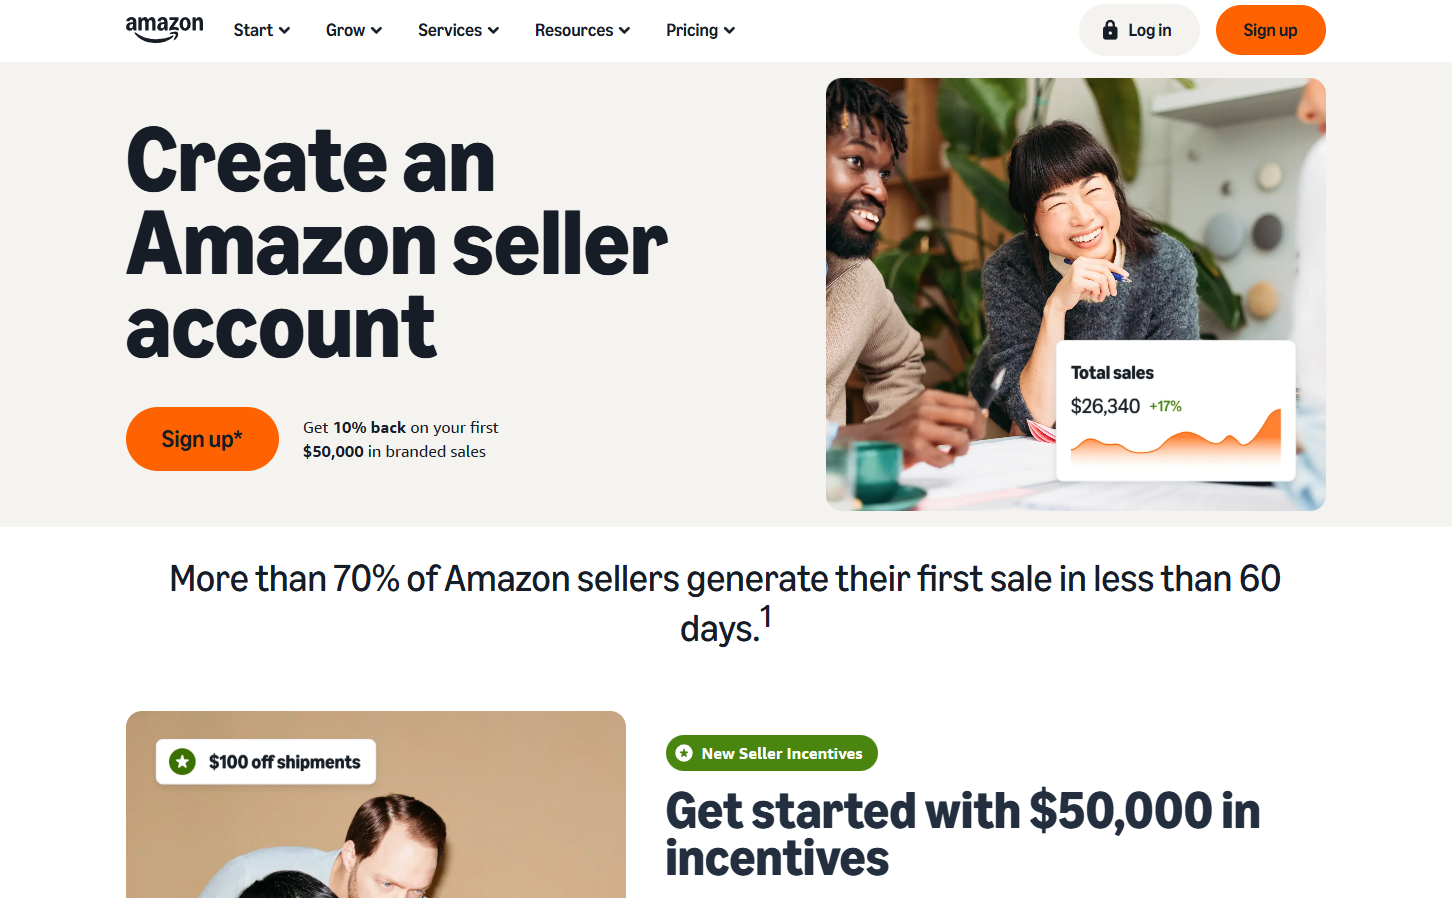
Amazon Seller Central Account Setup
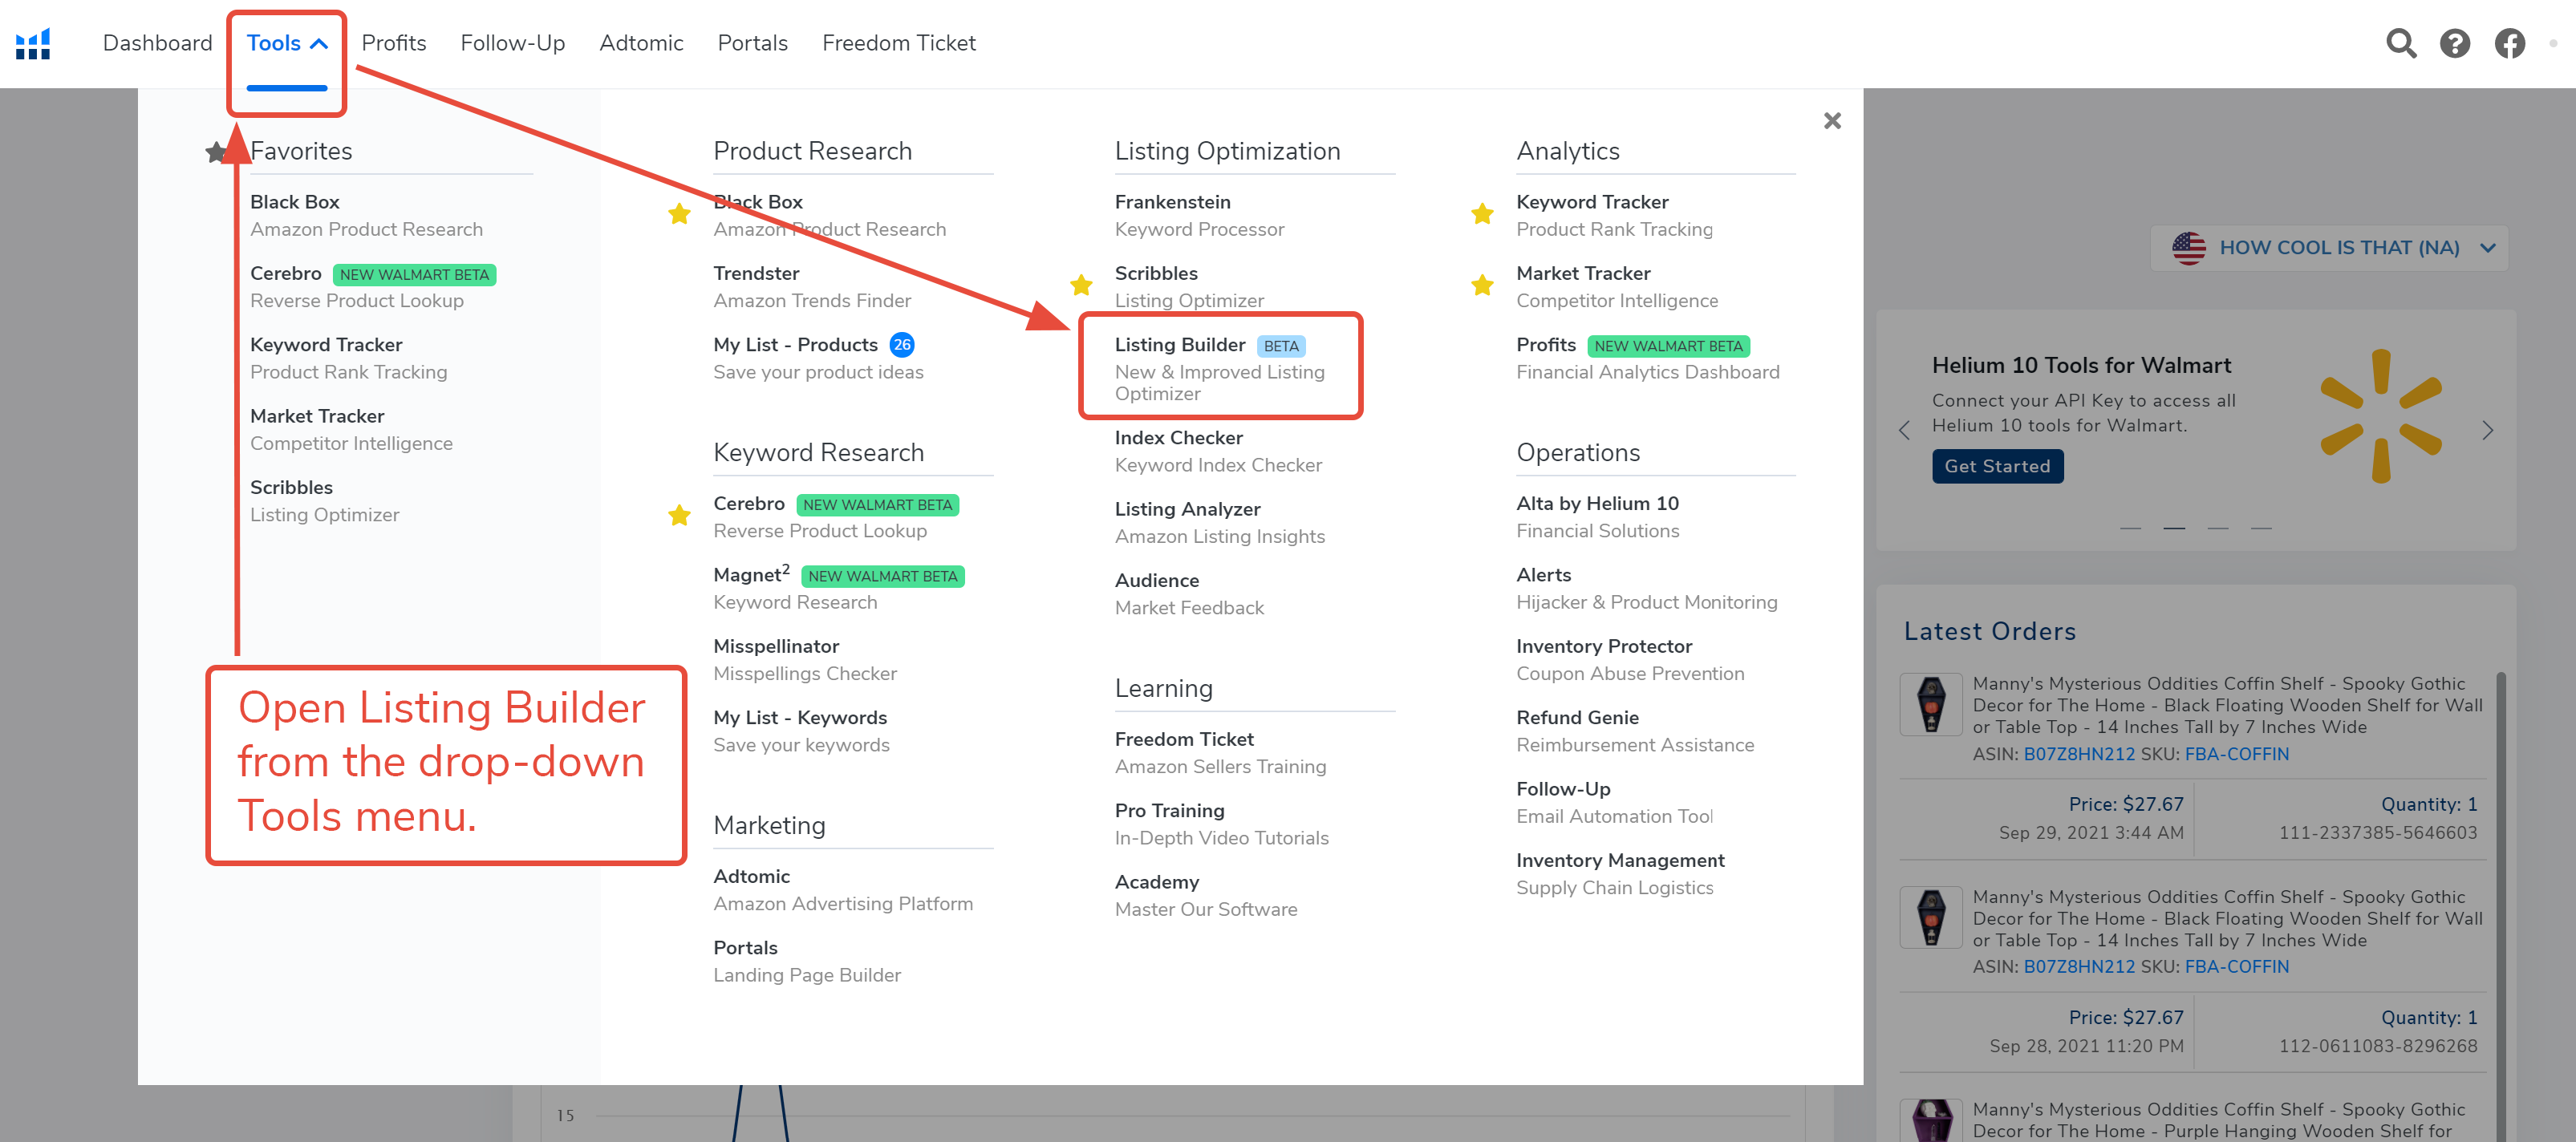
Accessing your Amazon Seller Central dashboard marks the first step toward creating your product listing. After logging into your account, click the three horizontal lines in the upper left corner. This reveals the main navigation menu. From there, navigate to “Catalog” and select “Add Products.” This begins the listing creation process.
Amazon presents two primary pathways for adding products. The first option allows you to list existing products already sold on Amazon. This is useful for retail arbitrage or wholesale sellers. They want to add their inventory to established listings. You’d simply search for the product and click “Sell this product.” Then, you add your offer to the existing listing alongside other sellers.
However, creating your own unique product requires selecting a different option. Choose “I’m adding a product not sold on Amazon.” This option opens a blank listing form. You’ll input all product information from scratch. Subsequently, you’ll control every aspect of the listing. This includes title, images, bullet points, description, and backend keywords. You won’t compete against other sellers on the same listing.
Understanding this fundamental distinction proves crucial for your Amazon business model. Private label sellers always create new listings for their branded products. They maintain exclusive control over pricing and presentation. This exclusivity represents one of private label selling’s most valuable advantages. It stands in contrast to wholesale or arbitrage models. In those models, multiple sellers compete on identical listings.
Getting Your UPC/Barcode from GS1
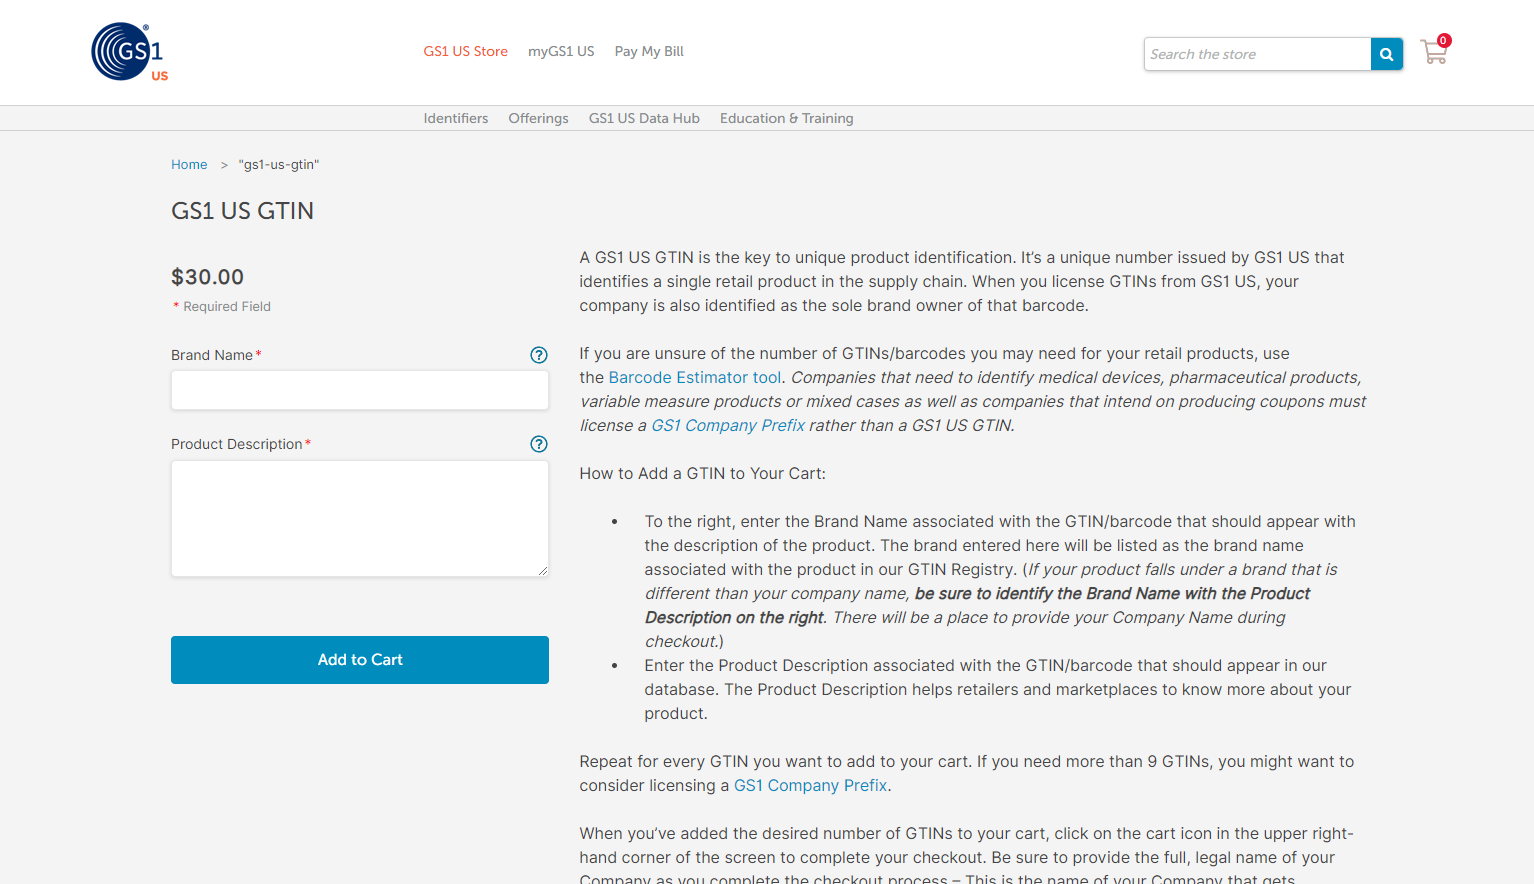
Every product sold on Amazon requires a unique product identifier. Most commonly, this is a UPC (Universal Product Code). This barcode allows Amazon’s system to track inventory and process orders. It distinguishes your product from millions of others in their catalog. Furthermore, retailers worldwide use these standardized codes. They manage products across supply chains and point-of-sale systems.
GS1 represents the only official source for legitimate UPC barcodes globally. Third-party websites sell barcodes at various price points. However, Amazon increasingly scrutinizes these codes. They may reject listings using non-GS1 barcodes. Investing approximately $30 for an official GS1 barcode protects your listing. It prevents potential issues and ensures compliance with Amazon’s authentication requirements.
The GS1 registration process requires creating an account and providing basic business information. You’ll receive your barcode via email within a few hours to a few days. Processing times vary. Additionally, GS1 offers bulk barcode purchases at discounted rates. This helps if you’re launching multiple products or variations simultaneously. It can save money for sellers with diverse product lines.
Travis offers assistance with barcode procurement for sellers who find the process confusing. He acknowledges it’s relatively straightforward, though. If you need support, you can email travis@passionproductformula.com for guidance. Nevertheless, most sellers successfully navigate the GS1 website independently. This makes it an accessible process even for complete beginners to e-commerce.
Brand Registry and Trademark Considerations
Amazon Brand Registry unlocks powerful features that significantly enhance your selling experience. It provides brand protection capabilities. With Brand Registry, you gain access to A+ Content. This includes enhanced product descriptions with images and formatted text. Furthermore, you get brand analytics and automated brand protection tools. Additionally, you can create listings for your branded products more easily. These features dramatically improve conversion rates and operational efficiency.
Obtaining Brand Registry requires a registered or pending trademark. You must get it from your country’s intellectual property office. In the United States, you file trademarks through the USPTO. This is the United States Patent and Trademark Office. It costs approximately $300 when you handle the application yourself. Attorneys charge $1,000-$2,000 for trademark services. However, the DIY approach works well for straightforward brand names and logos.
Remarkably, Amazon accepts pending trademarks for Brand Registry enrollment. This means you don’t need to wait for final approval. Once the USPTO issues your serial number, you can immediately apply for Brand Registry. This typically happens within a few weeks of filing. This timeline allows you to access premium features right away. Meanwhile, your trademark application proceeds through the standard 6-12 month examination process.
Operating without Brand Registry remains possible but imposes limitations. You’ll need to ensure your brand name matches exactly. It must match between your GS1 barcode registration and Amazon listing. Additionally, Amazon requires uploading product images. These must clearly display your brand name on the packaging itself. Despite these workarounds, Brand Registry’s benefits justify the trademark investment. This applies to serious sellers building long-term brands.
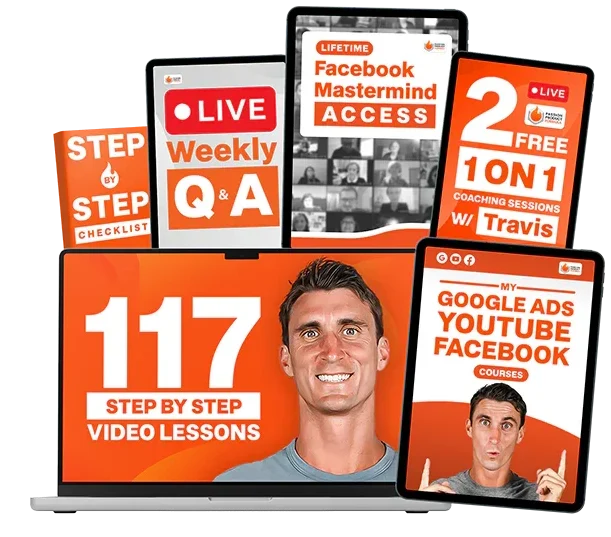
Professional Listing Creation Services
FBA Creatives specializes in creating high-converting Amazon listings. They create optimized titles, persuasive bullet points, professional product images, and stunning 3D renders. Travis partners with this company. This ensures their services align with proven strategies that drive sales. Their designers understand Amazon’s unique conversion factors. They create assets specifically optimized for the platform’s visual and algorithmic requirements.
Professional listing creation services save enormous time. They typically deliver better results than DIY attempts. Creating product images yourself requires photography equipment, lighting setups, and photo editing skills. It also demands significant time investment. Similarly, writing optimized copy requires understanding keyword research and persuasive writing. You must also understand Amazon’s technical requirements. FBA Creatives handles all these elements cohesively. This ensures visual and textual elements work together effectively.
The investment in professional services often pays for itself. Higher conversion rates and better search rankings make up the cost. A premium package from FBA Creatives costs several hundred dollars. However, it creates assets you’ll use throughout your product’s entire lifecycle. Moreover, their 3D render technology creates impossibly perfect product images. Photography cannot match these results. They show your product in ideal lighting and positioning. This maximizes appeal.
Travis offers a discount code “Travis” for 40% off FBA Creatives services. This makes professional listing creation more accessible for new sellers. You can certainly create listings independently. You can use free tools and your smartphone camera. However, professional services accelerate your time to market. They reduce the trial-and-error learning curve. Consequently, many successful sellers invest in professional assets for flagship products. They handle listing creation independently for subsequent line extensions.
Keyword Research: The Foundation of Your Listing

Why Keywords Matter on Amazon
Amazon functions as a search engine first and marketplace second. Customers arrive with specific purchase intent. They type search queries like “carnivore jerky,” “clove tea,” or “pork rind breadcrumbs.” They’re looking to find products meeting their needs. Amazon’s algorithm analyzes your listing content to determine which search queries should display your product. This makes keyword optimization absolutely critical for visibility and sales.
Your listing must explicitly tell Amazon’s algorithm what keywords describe your product. Unlike Google, Amazon doesn’t use sophisticated natural language processing to infer meaning. Instead, Amazon relies heavily on exact keyword matches. These must appear in your title, bullet points, description, and backend search terms. Therefore, if “clove tea” never appears in your listing, Amazon won’t show your product. This happens when customers search that term. It doesn’t matter how obviously relevant your product might be.
Keyword optimization directly impacts both search rankings and conversion rates. Strategically placing keywords in your title ensures customers immediately recognize your product as relevant. Subsequently, they click your listing rather than scrolling past to competitors. Furthermore, keyword-optimized bullet points answer customer questions. They address search intent and build confidence. This drives purchase decisions.
The compound effect of proper keyword research cannot be overstated. Products ranking on page one for profitable keywords generate consistent organic sales. You won’t need advertising spend. These sales improve your overall ranking. This creates a virtuous cycle of visibility and revenue. Conversely, poorly optimized listings languish on page five or beyond. Virtually no customers venture there. This happens regardless of your product’s actual quality or competitive pricing.
Using Helium 10’s Magnet Tool
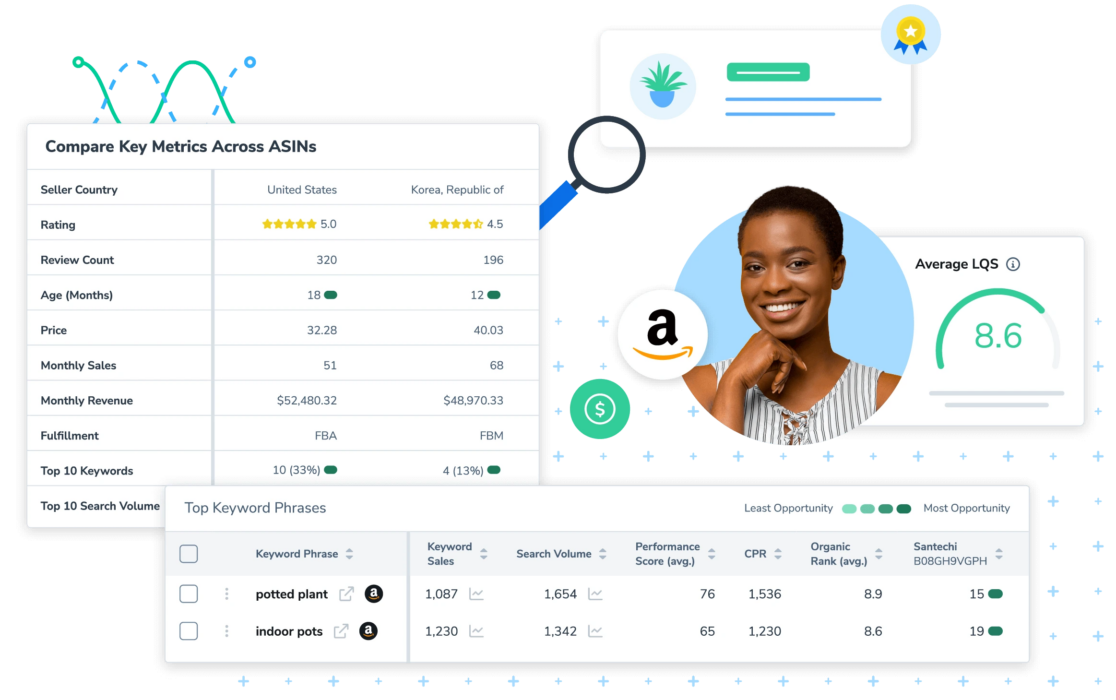
Helium 10 provides the most comprehensive keyword research tools specifically designed for Amazon sellers. Their Magnet tool reveals search volumes, competition levels, and related keywords. You can enter any search term. Travis consistently recommends Helium 10 as an essential investment. He offers a 35% discount code through travisarziani.com/helium10. This makes the platform accessible even for bootstrapped entrepreneurs.
Starting your keyword research requires entering your primary product term into Magnet. For the pork rind breadcrumbs example, Connor searched “ground pork rind.” This discovered all related search terms customers actually use. The tool returned hundreds of keyword variations. Each came with complete monthly search volume data, competition metrics, and suggested difficulty scores.
Filtering results strategically focuses your attention on viable opportunities. It prevents overwhelming you with irrelevant data. Connor set a minimum search volume filter of 150 monthly searches. This eliminated ultra-long-tail keywords that generate insufficient traffic to matter. Additionally, using the “phrase containing” filter lets you narrow results. You can focus on keywords actually relevant to your product. This eliminates tangentially related terms.
The goal involves identifying 20-50 highly relevant keywords. These should span different competition levels and search volumes. You’ll organize these keywords into a dedicated folder within Helium 10. This creates your master list for listing optimization. Subsequently, you’ll ensure these keywords appear throughout your listing. They should be in your title, bullets, description, and backend search terms. Use natural, customer-friendly language that satisfies both algorithms and human readers.
Keyword Categories Explained
Strategic keyword research requires understanding three distinct keyword categories. These are safety keywords, goal keywords, and reach keywords. This framework helps you set realistic ranking expectations. It helps you allocate resources appropriately across different keyword difficulty levels. Moreover, it ensures your listing can generate sales immediately. You’ll also position yourself for long-term growth into more competitive terms.
Safety keywords represent low-competition terms you can confidently rank for within days or weeks. These keywords typically have CPR scores of 8-10. This means you only need one sale per day for eight days to achieve page-one rankings. Additionally, safety keywords show Magnet IQ scores at least 3-5 times higher than their search volume. This indicates relatively weak competition and high opportunity.
Goal keywords offer medium competition with sustainable search volumes worth pursuing. These terms might require 15-30 sales over eight days to rank. They represent manageable targets as your sales velocity increases. Goal keywords typically drive the majority of your revenue. This happens once you’ve established initial traction through safety keywords. You’ll have built positive momentum.
Reach keywords represent aspirational targets with high search volumes and intense competition. Terms requiring 50-100+ sales in eight days fall into this category. You probably won’t rank for reach keywords initially. However, including them in your listing establishes relevance. This pays dividends later. Furthermore, as your overall listing authority increases, you’ll gradually improve rankings. Sales and reviews help you rank for these valuable high-volume terms.
Analyzing Keyword Metrics
Helium 10 provides several critical metrics that inform your keyword selection decisions. Search volume indicates how many customers search that exact term monthly on Amazon. Higher search volumes represent greater traffic potential. However, they also typically correlate with increased competition. Consequently, you’ll want a balanced mix of high and medium volume keywords. Don’t exclusively target the biggest terms.
The Magnet IQ Score quantifies opportunity by comparing search volume against existing competition. Scores above 400-500 generally indicate excellent opportunities. Scores below 100 suggest saturated markets. Specifically, you want Magnet IQ scores at least 3-5 times larger than search volume. This applies to safety keywords. It signals that demand significantly exceeds current supply.
CPR estimates how many sales you need over eight days to reach page one for specific keywords. This metric proves invaluable for setting realistic launch targets. It helps you understand the effort required for different keywords. For example, a CPR of 8 means one sale daily. Meanwhile, a CPR of 40 requires five sales daily. These are dramatically different targets requiring different marketing strategies.
Analyzing these metrics together reveals your optimal keyword strategy. Connor identified multiple keywords with search volumes around 150-300. They had Magnet IQ scores over 1,000 and CPR scores of 8-10. These safety keywords formed his foundation. They ensured the listing would generate baseline sales. Meanwhile, higher-volume terms with CPR scores of 26-40 became goal keywords. These were worth pursuing through advertising and promotional campaigns. He’d target them once initial traction was established.
Building Your Keyword Bank
Creating a comprehensive keyword bank requires systematic research across multiple related search terms. Don’t limit yourself to one seed keyword. Instead, explore variations, synonyms, and customer language patterns. For pork rind breadcrumbs, Connor researched several terms. He looked at “ground pork rind,” “pork breadcrumbs,” “carnivore breadcrumbs,” and related terms. This captured the full spectrum of customer search behavior.
Helium 10 allows you to create folders organizing keywords by product or campaign. Connor created a “Carnivore Breadcrumbs” folder. It contained all relevant keywords he discovered during research. This organization proves essential later. You’ll use Helium 10‘s Listing Builder tool. It pulls keywords from your saved folders. This ensures comprehensive coverage across your listing elements.
Invest adequate time in thorough keyword research. This foundation determines your product’s entire visibility potential. Rushing through keyword research to save an hour today can cost you thousands of dollars. You’ll lose sales over your product’s lifetime. Experienced sellers typically spend 2-4 hours researching keywords for each new product. They explore every angle. This ensures no valuable opportunities slip through the cracks.
Your keyword bank becomes a living document. You’ll reference it throughout your product’s lifecycle. Initially, you’ll use these keywords to optimize your listing. Subsequently, you’ll target them in PPC advertising campaigns. You’ll use them for external traffic efforts and ranking strategies. Additionally, you’ll monitor your ranking position for each keyword over time. You’ll adjust your optimization and advertising based on performance data.
Creating Your Amazon Listing Step-by-Step

Starting Your Listing
Beginning your listing creation requires selecting a specific option from the Add Products page. Choose “I’m adding a product not sold on Amazon.” This choice opens a blank form. You’ll build your listing from scratch. Amazon will ask for your product identifier type. This could be UPC, EAN, ISBN, or others. You’ll also enter the actual code number. This comes from GS1 or your country’s equivalent barcode issuing authority.
Enter your UPC code carefully. Double-check for transcription errors that could delay your listing approval. Once you submit your UPC, Amazon searches their catalog. They verify no existing listing uses that code. For new products, you’ll receive confirmation that no matches exist. This correctly indicates you’re creating an original listing. You’re not duplicating existing catalog entries.
This verification step protects against accidental duplication. It ensures the integrity of Amazon’s catalog. If Amazon finds an existing listing using your UPC code, you’ll need to investigate the issue. Either you’ve entered the wrong code, or something else happened. Someone may have inappropriately used your barcode on their listing. Brand Registry helps resolve such conflicts. However, prevention through careful UPC management works best.
After confirming your unique UPC, Amazon prompts you to enter your product title. This title drives initial categorization. Amazon’s algorithm attempts to suggest appropriate product categories. It bases suggestions on the words you use. Consequently, including your primary keywords in the title from the beginning helps Amazon. They’ll place your product in the correct browse nodes and taxonomies.
Crafting the Perfect Title
Your Amazon title serves multiple critical functions simultaneously. First, it must include your primary keywords near the front. This maximizes algorithmic relevance signals. Second, it needs to communicate your product’s core value proposition to human customers instantly. Third, it should differentiate your product from competitors. These competitors appear in the same search results. Balancing these objectives requires strategic thinking and careful word selection.
Helium 10‘s Listing Builder AI analyzes your keyword bank. It generates optimized title suggestions incorporating high-priority terms. Connor used this feature to create his opening phrase. “Ground Pork Rind Crumbs – Carnivore Breadcrumbs” immediately signals relevance. This works for his top two target keywords. This front-loading strategy ensures customers searching either term immediately recognize his product as relevant.
Title length limits vary by category. Most Amazon categories allow 150-200 characters. Use this space strategically by including secondary keywords, benefit statements, and differentiators. Place these after your primary terms. For example, you might add descriptive phrases. “100% USA Made, Zero Carb, Keto Friendly, Gluten Free Alternative” captures additional search terms. It also highlights unique selling propositions.
Avoid keyword stuffing or unnatural phrasing that confuses customers. Algorithmic optimization matters, but human readability ultimately drives clicks and conversions. Test your title by reading it aloud. If it sounds awkward or spammy, revise it. Furthermore, consider how your title appears truncated on mobile devices. Character limits display fewer words there. Place your most critical information within the first 80 characters. This ensures mobile visibility.
Selecting the Right Product Category
Amazon automatically suggests product categories based on your title keywords. However, you should verify this suggestion matches your strategic intent. Categories determine which browse nodes your product appears in. They determine what attributes you’ll need to complete. They also determine which products Amazon considers competitive. Therefore, category selection significantly impacts discoverability and ranking potential.
Connor’s pork rind breadcrumbs received a suggestion for the “Breadcrumbs and Stuffing Panko” category. Technically, his product functions as a breadcrumb alternative rather than actual breadcrumbs. However, this category accurately represents the use case and customer search behavior. Accepting this category placed his product where customers actively searching for breadcrumb alternatives would discover it.
Sometimes Amazon’s automated suggestions miss the mark entirely. You can manually search for more appropriate categories. Use the category selection tool. Research your top competitors to see which categories they’ve chosen. This reveals where customers expect to find products like yours. Additionally, some categories offer less competition or better visibility. This makes strategic category selection a subtle competitive advantage.
Certain categories require approval or impose additional requirements. These might include safety certifications, age restrictions, or hazmat documentation. Review Amazon’s category requirements before finalizing your selection. This avoids delays during the listing approval process. Furthermore, some categories generate higher referral fees than others. This slightly impacts your profit margins. Balance these considerations against visibility and relevance when making your final category decision.
Writing Compelling Bullet Points
Bullet points represent your primary opportunity to communicate product benefits. You can address customer objections and incorporate supporting keywords beyond your title. Amazon allows five bullet points per listing. Each can hold approximately 500 characters including spaces. Strategic sellers use this real estate to systematically address customer questions. They build purchase confidence.
The most effective bullet point format begins with an ALL CAPS feature headline. This is followed by a detailed explanation. For example: “ZERO CARB CARNIVORE APPROVED – Our ground pork rind crumbs contain absolutely zero carbohydrates.” Continue with benefits. “Making them perfect for strict carnivore, keto, and low-carb lifestyles without compromising on texture or flavor.” This structure creates visual hierarchy and scanability. It incorporates keywords naturally.
Helium 10‘s Listing Builder AI generates bullet point suggestions based on your keyword bank. This ensures comprehensive keyword coverage. However, you should customize these suggestions to highlight product-specific benefits. AI cannot know these without additional input. Connor specifically added information about USA manufacturing. His target customers value domestic production. This detail didn’t emerge from purely algorithmic keyword analysis.
Balance keyword optimization with genuine customer value throughout your bullets. Address common questions like ingredient sourcing, usage instructions, quantity details, and storage recommendations. Additionally, preemptively answer objections. Highlight certifications, quality guarantees, or policies like satisfaction guarantees. Each bullet should give customers another reason to choose your product. They’re comparing you to twenty other options in their search results.
Creating Your Product Description
The product description section receives less visual prominence than bullet points on desktop browsers. However, mobile users often scroll through descriptions carefully. Additionally, Amazon’s algorithm indexes description content for keyword ranking purposes. This makes this field valuable for incorporating additional keywords. Use terms that didn’t fit naturally into your title and bullets.
Keep descriptions concise and benefit-focused. Don’t simply repeat bullet point information. Instead, tell your product’s story or explain your brand’s mission. Alternatively, elaborate on usage scenarios that help customers envision using your product. For example, describe how pork rind breadcrumbs transform favorite recipes into carnivore-friendly versions. Or explain the traditional wellness uses of clove tea in various cultures.
FBA Creatives and similar services typically provide description copy as part of their listing packages. This professionally written content balances keyword density with readability. It maximizes SEO value without creating spammy, repetitive text. Nevertheless, read through provided descriptions carefully. Personalize them to reflect your authentic brand voice. Include your unique product attributes.
Sellers with Brand Registry can eventually upgrade to A+ Content. This replaces standard descriptions with visually rich layouts. These include images, comparison charts, and formatted text modules. This enhanced content significantly improves conversion rates. It allows deeper storytelling. However, you’ll need to launch with standard descriptions initially. This makes it important to create solid foundational copy. It should serve customers effectively.
Optimizing Product Images
Your main product image must feature your product on a pure white background. Amazon requires RGB 255, 255, 255 according to their official requirements. This image should fill at least 85% of the frame. Show your product clearly without lifestyle props, text overlays, or brand watermarks. Most sellers use 3D renders rather than photography. Renders achieve impossibly perfect lighting, positioning, and clarity. Photographs cannot match these results.
FBA Creatives specializes in creating these photorealistic 3D renders. They work from product dimensions, packaging designs, and reference materials you provide. These renders look indistinguishable from professional photography to customers. They offer complete control over every visual element. Furthermore, 3D renders eliminate photography costs, timing constraints, and quality inconsistencies. This helps across different product variations or line extensions.
Secondary images typically number 6-7 total. They showcase your product’s benefits, features, and use cases through infographics and lifestyle contexts. These images should address specific customer questions and objections systematically. For example, one image might display nutritional information. Another shows size comparisons. A third demonstrates use cases. A fourth highlights certifications or quality assurances like “Made in USA” or “USDA Organic.”
Amazon’s official policies prohibit showing items not included with the product. They also prohibit displaying products in contexts unrelated to their actual use. However, virtually all successful sellers use secondary images differently. They show food products in prepared dishes. They show supplements alongside healthy lifestyles. Amazon rarely enforces these guidelines for secondary images. They’re strict about main image compliance, though. Consequently, create compelling secondary images that sell benefits. Understand your main image must follow rules precisely.
Product Details and Specifications
The product details section requests specific attributes. These include manufacturer name, number of items, ingredients, flavors, and serving information. Complete every applicable field thoroughly. This information feeds Amazon’s filtering and search systems. Customers often filter search results by specific attributes. Missing data excludes your product from those refined searches.
For manufacturer, most private label sellers list their brand name. They don’t list their actual manufacturing partner’s name. This approach maintains brand consistency. It protects proprietary sourcing relationships. Number of items should reflect what customers receive. For Clove Tea, Travis specified 14 tea bags. Each pouch contains that quantity. This clearly communicates the value customers receive.
Ingredients or materials deserve careful attention. This is especially true for consumable products. List ingredients in descending order by weight. Match your physical packaging exactly to maintain compliance and customer trust. Additionally, highlight any allergen information. Include certifications like organic, non-GMO, or gluten-free. Mention special attributes that customers might filter by when searching.
Fill optional fields whenever possible. This maximizes your listing’s completeness and discoverability. Serving size, portions per container, flavor, scent, color, size, weight, dimensions each completed attribute strengthens your listing. Furthermore, comprehensive product data improves customer experience. It answers questions proactively. This reduces customer service inquiries. It also prevents potential negative reviews from confused customers. They received exactly what was described.
Pricing Strategy
Strategic pricing balances profitability, competitiveness, and psychological factors. These factors influence purchase decisions. Start by calculating your all-in costs. Include product manufacturing, Amazon fees (referral fees and FBA fees), shipping to Amazon, and desired profit margins. This calculation establishes your absolute minimum viable price point.
Research competitor pricing carefully to understand market expectations. Customers develop price anchors based on what similar products cost. Deviating too far above market rates suppresses conversions. This happens regardless of your superior quality. Conversely, pricing significantly below competitors can trigger suspicion. Customers may question quality or authenticity. This paradoxically reduces sales despite the apparent value.
Psychological pricing principles suggest prices ending in .99 or .97 outperform round numbers. Travis initially considered $20.24 for his clove tea. However, he ultimately selected $19.99. The psychological difference between $19 and $20 outweighs the minimal 25-cent revenue difference. Similarly, $24.97 often outperforms $25.00. The actual difference barely registers.
Launch pricing often differs from long-term pricing strategies. Many sellers initially price aggressively low. This generates sales velocity, reviews, and ranking momentum. Once you’ve achieved page-one rankings and accumulated 50+ reviews, you can gradually increase prices. This reaches optimal profit margins. This dynamic pricing approach maximizes long-term profitability. It accepts lower margins during the critical launch phase.
Advanced Listing Optimization with Helium 10
The Listing Builder Tool
Helium 10‘s Listing Builder tool revolutionizes the optimization process. It ensures comprehensive keyword coverage across your entire listing. After creating your keyword bank in Magnet, you import those keywords into Listing Builder. The tool then tracks whether you’ve incorporated each term. It checks your title, bullets, description, and backend search terms. This systematic approach prevents accidentally omitting valuable keywords during the writing process.
The tool displays your keyword list alongside your listing fields. It color-codes each keyword to show coverage status. Green indicates you’ve used the keyword sufficiently. Yellow suggests marginal coverage. Red flags completely missing keywords. This visual feedback ensures you don’t overlook any terms from your carefully researched keyword bank. You’ll maximize your ranking potential across all target search queries.
Listing Builder’s AI writing assistance generates optimized copy. It incorporates your keywords naturally. You can either accept these AI suggestions directly or use them as starting templates for customization. Connor demonstrated this by having AI generate his bullet points. Then, he personalized them with product-specific details like USA manufacturing. Algorithmic writing couldn’t know this without additional input.
The iterative optimization process involves writing initial copy. Then, review the keyword coverage report. Identify gaps and revise your content to incorporate missing terms. You’ll balance keyword density against readability. Ensure your listing serves both algorithmic and human audiences effectively. Consequently, this methodical approach produces listings that rank well. They also convert browsers into buyers through compelling, benefit-focused copy.
Ensuring Keyword Coverage
Comprehensive keyword coverage requires incorporating your entire keyword bank. Use four primary listing elements: title, bullet points, description, and backend search terms. Each element serves different purposes and receives different algorithmic weighting. This makes strategic keyword distribution essential. You’ll maximize visibility across all your target search queries.
Your title carries the heaviest algorithmic weight. It receives the most customer attention. Place your highest-priority keywords here. Focus particularly on your primary 1-3 terms that drive the most valuable traffic. Front-loading these keywords ensures they appear even when titles truncate. This happens on mobile devices or in certain display contexts.
Bullet points offer the second-most valuable keyword real estate. Simultaneously, they communicate benefits to customers. Distribute your remaining important keywords throughout all five bullets. Ensure natural incorporation that maintains readability. Avoid awkward keyword stuffing that makes bullets sound robotic or repetitive. Customers still need to find this information helpful and persuasive.
Backend search terms provide keyword coverage without affecting customer-facing copy. Amazon allows approximately 250 bytes of backend keywords. Here you can include synonyms, alternate spellings, abbreviations, and related terms. These didn’t fit naturally into your visible content. Fill this field completely. Separate terms with spaces rather than commas. Avoid repeating keywords already present in your title, bullets, or description.
Listing Score and Optimization
Helium 10 assigns your listing a quality score. This bases on keyword coverage, character count optimization, and other best practices. Higher scores correlate with better ranking potential and conversion rates. This provides an objective benchmark for listing quality. Aim for scores above 80%. Achieving perfect 100% scores often requires compromising readability for algorithmic perfection.
Continuously refine your listing based on performance data. Don’t treat optimization as a one-time task. Monitor which keywords drive traffic and conversions. Use Amazon’s Search Query Performance report in Seller Central. If certain keywords generate clicks but few sales, your listing may need better benefit communication. This applies to that search intent. Conversely, keywords driving strong conversion rates deserve more prominent placement. They potentially deserve increased advertising spend.
A/B testing different titles, bullet points, and images reveals what resonates best. Test with your specific audience. Amazon’s Manage Your Experiments tool allows Brand Registry sellers to test variations systematically. Even without this official tool, you can manually test changes. Update your listing and monitor conversion rate changes over subsequent weeks.
Listing optimization never truly ends. Markets evolve, competition changes, and customer preferences shift. Schedule quarterly listing reviews. Research current competitor listings during these reviews. Identify emerging keywords. Refresh your images and copy to maintain competitive advantages. This ongoing commitment to excellence separates top-performing listings. They dominate their categories from stagnant listings. Stagnant listings slowly lose ground to more aggressive competitors.
Common Listing Mistakes to Avoid

New sellers repeatedly make predictable mistakes that suppress rankings and conversion rates. Missing your primary keyword in the title represents the most damaging error. If you’re selling clove tea but your title says “Herbal Wellness Tea,” you’ll struggle. You won’t rank when customers search your exact product. It never mentions cloves. Front-load your primary keyword prominently to avoid this costly mistake.
Neglecting bullet point optimization wastes valuable ranking and conversion opportunities. Some sellers write minimal bullets. Others simply list basic features without elaborating on benefits. Your bullets should educate customers, answer questions, address objections, and paint a compelling picture. Show how your product improves their lives. Furthermore, each bullet should incorporate keywords naturally. Maintain readability and persuasiveness.
Poor quality images dramatically suppress conversion rates. This happens regardless of product quality or pricing. Blurry photos, inconsistent lighting, cluttered backgrounds, or images that don’t showcase your product’s key benefits will hurt you. Customers will click to competitor listings. Invest in professional photography or 3D renders. Present your product in the absolute best light possible. Recognize that visual presentation often outweighs actual product quality in purchase decisions.
Incomplete product details leave money on the table. They limit your discoverability through filters and attributes. Take time to complete every applicable field in the product detail sections. Provide comprehensive information that helps Amazon categorize your product correctly. Help customers find exactly what they need through refined searches. This thoroughness signals professionalism. It builds customer confidence while maximizing your listing’s technical completeness.
The Review Process and Going Live

Amazon’s 4-Day Mandatory Review
Amazon recently implemented a mandatory four-day review period for all new product listings. This policy helps them combat fraudulent listings, counterfeit products, and policy violations. They catch these before products go live. Consequently, you cannot assume your listing will become active immediately after submission. This applies even if all information appears correct and compliant.
The review timeline varies unpredictably despite the four-day standard. For instance, some listings receive approval within hours. Others remain under review for the full four days or occasionally longer. Amazon doesn’t provide detailed status updates during this period. This leaves sellers checking their inventory dashboard repeatedly. They’re waiting to see when their listing transitions from “Pending” to “Active” status.
This mandatory review period significantly impacts launch timelines and inventory planning. You cannot start driving traffic or running advertising campaigns until your listing goes live. Therefore, factor these potential delays into your launch calendar. Account for them in product announcement timing and promotional campaign schedules. This avoids disappointing customers or wasting advertising budgets on unavailable products.
Travis experienced this delay with his Clove Tea launch. It postponed his intended timeline. However, Connor’s pork rind breadcrumbs cleared review almost immediately. This demonstrates the unpredictability of this process. Plan for the worst-case scenario while hoping for quick approval. Ensure you’re not locked into time-sensitive commitments. Amazon’s review process might disrupt these.
Monitoring Your Listing
Check your listing status regularly through Seller Central‘s Inventory dashboard. New listings appear with status indicators. These show whether they’re “Incomplete,” “Under Review,” “Inactive,” or “Active.” Only active listings display to customers and accept orders. This makes this status transition the critical milestone for beginning your sales operations.
Once Amazon approves your listing, it typically appears in search results within 15 minutes to 24 hours. However, initial indexing doesn’t guarantee immediate ranking for your target keywords. Amazon’s algorithm needs time to evaluate your listing’s relevance. You’ll likely appear on page 10+ initially. You need to generate sales velocity and accumulate positive reviews first.
Monitor your listing carefully during the first few weeks for unexpected changes or suppression. Sometimes Amazon flags listings for policy reviews after initial approval. This particularly happens for products in restricted categories. It also happens for listings using keywords Amazon considers problematic. Respond promptly to any policy notifications. Maintain your listing’s active status. Avoid sales disruptions.
Set up automated monitoring tools that alert you to Buy Box losses, suppressed listings, or other critical changes. Your listing represents your business’s storefront. Any disruption directly impacts revenue. Consequently, staying vigilant about listing health and addressing issues immediately minimizes lost sales. It protects your hard-earned search rankings.
Preparing for Launch
Before driving traffic to your newly live listing, ensure your inventory situation supports sustained sales. Stockouts devastate your search rankings. They often require weeks or months to recover your previous positions. Therefore, have adequate inventory either in your own warehouse for FBM. Alternatively, have it already received at Amazon’s fulfillment centers for FBA. Do this before initiating marketing campaigns.
Develop a ranking strategy targeting your safety keywords first. These low-competition terms require minimal sales velocity to achieve page-one rankings. This establishes initial momentum and credibility. Subsequently, the sales and reviews you generate through safety keyword rankings provide the authority needed. You can then compete for more valuable goal keywords over time.
Plan your review generation strategy carefully. Remain compliant with Amazon’s terms of service. You cannot pay for reviews and cannot offer compensation for positive reviews. You cannot use manipulative tactics to generate fake reviews. However, you can use Amazon’s “Request a Review” button. You can enroll in programs like Amazon Vine. You can follow up with customers requesting honest feedback about their purchase experience.
Consider using launch services or promotional campaigns that generate sales velocity quickly. Many sellers offer significant discounts. They run giveaways during launch periods to accumulate reviews and ranking momentum rapidly. While these tactics reduce short-term profitability, they establish the foundation for long-term organic sales. This ultimately drives sustainable business growth.
Why Your Listing Quality Determines Success

Customers purchasing on Amazon face a fundamental limitation. They cannot physically examine, touch, taste, or try your product before committing to purchase. Your listing must overcome this limitation entirely. Use visual presentation, persuasive copy, and social proof from reviews. Consequently, listing quality often outweighs actual product quality in determining sales success. This particularly applies during the critical early stages before reviews accumulate.
High-quality listings communicate professionalism and credibility instantly. Customers subconsciously evaluate whether your brand seems trustworthy. They base this on image quality, copy polish, and attention to detail. Blurry photos or grammatically incorrect bullets trigger skepticism about product quality. This happens even if your actual product significantly exceeds competitors’ offerings. Therefore, investing in professional listing creation often generates better ROI. It outperforms marginal product improvements.
Conversion rate differences between mediocre and excellent listings compound dramatically over time. A listing converting 15% of visitors to customers generates twice the sales. Compare this to a listing converting 7.5%, assuming equal traffic levels. Furthermore, higher conversion rates signal relevance to Amazon’s algorithm. This improves your organic rankings. It attracts even more traffic. This virtuous cycle explains why top listings dominate their categories. Similar products languish in obscurity.
Your listing also determines long-term review velocity and quality. Clear product descriptions, accurate specifications, and realistic images set appropriate customer expectations. When products match or exceed these expectations, customers leave positive reviews. Conversely, misleading listings generate negative reviews from disappointed customers. They received exactly what was described. However, they expected something different based on ambiguous marketing.
Mastering Your Amazon Launch Strategy

Creating a high-converting Amazon listing requires mastering multiple disciplines simultaneously. You need keyword research, copywriting, graphic design, pricing strategy, and Amazon’s technical requirements. This comprehensive guide has walked you through each essential element. However, transforming knowledge into action while avoiding costly mistakes demands focus and commitment. Your listing represents your product’s first impression and primary sales vehicle. This makes excellence non-negotiable.
The Passion Product Formula approach elevates standard private label selling. It emphasizes products you genuinely care about. This passion translates into better product development decisions and more authentic marketing. It provides sustained motivation through inevitable challenges. Travis’s success with Carnivore Jerky demonstrates this. His rapid launch of Clove Tea shows how combining market demand with personal interest creates sustainable business opportunities. Generic product selection cannot match this.
Remember that keyword research forms your listing’s foundation. It determines whether customers can even discover your product amid Amazon’s crowded marketplace. Tools like Helium 10 transform this complex process into manageable, systematic workflows. They ensure comprehensive keyword coverage. The modest investment in these professional tools pays for itself many times over. You’ll see improved rankings, higher conversion rates, and accelerated time to profitability.
Professional services like FBA Creatives remove barriers preventing many entrepreneurs from launching high-quality products. Rather than spending months learning graphic design, photography, and copywriting, you can leverage specialized expertise. This delivers superior results faster. This approach lets you focus on strategic decisions. Think about product selection, market positioning, and business growth. You won’t get bogged down in tactical execution of listing creation tasks.
Resources to Accelerate Your Success
The Passion Product Formula program provides comprehensive coaching and support. It helps entrepreneurs building Amazon FBA businesses. Beyond generic training, the program offers personalized guidance. This tailors to your specific product niche, target market, and business goals. Accelerator programs fast-track your progress through intensive coaching. Meanwhile, orientation calls help you navigate the overwhelming initial decisions every new seller faces.
Done-for-you product development services handle the entire process from concept to launch. These services are perfect for entrepreneurs who recognize opportunity but lack time or expertise. They can’t execute independently. These services leverage Travis’s extensive experience and proven frameworks. They dramatically reduce your learning curve. They help you avoid expensive mistakes that plague first-time sellers. Furthermore, having expert support ensures you’re building on solid foundations. You won’t discover critical gaps after investing heavily in inventory.
Professional tools represent essential investments rather than optional expenses. Helium 10 provides the data-driven insights needed to make confident product decisions. You’ll optimize listings effectively and monitor competitive dynamics. The 35% discount available through travisarziani.com/helium10 makes this powerful platform accessible. It offers features worth thousands of dollars in improved business outcomes. You pay only a modest monthly subscription.
FBA Creatives transforms your product presentation through professional graphics. These are optimized specifically for Amazon’s unique conversion factors. Their 40% discount code “Travis” significantly reduces the investment barrier. It ensures your listing competes visually with established brands. Quality presentation levels the playing field. New products can compete based on merit. They won’t be dismissed due to amateur presentation.
Your Next Steps
Begin your Amazon FBA journey by identifying products that align with the Passion Product Formula principles. What interests, hobbies, or lifestyle choices already occupy your attention? These areas represent your competitive advantages. You naturally understand customer needs there. You can identify improvement opportunities that generic sellers overlook. List 10-20 potential product ideas. Combine your interests with market demand indicators.
Conduct thorough keyword research for your top three product ideas. Use Helium 10‘s free trial or starter plan. Evaluate search volumes, competition levels, and CPR scores. Identify which opportunities offer the clearest path to profitability. This research-first approach prevents investing months and thousands of dollars into products with fatal flaws. These flaws are only discoverable through proper market analysis.
Secure your foundational business elements. Get your Amazon Seller Central account, GS1 barcodes, and potentially a trademark application. This applies if you’re committed to building a long-term brand. These administrative tasks feel tedious compared to exciting product development work. However, they’re essential infrastructure. They prevent delays when you’re ready to launch.
Contact travis@passionproductformula.com if you need personalized guidance navigating these initial steps. Alternatively, you might want to explore how the Passion Product Formula program can accelerate your success. Sometimes the difference between successful launch and expensive failure comes down to expert guidance at critical decision points. This makes professional support a wise investment.
Frequently Asked Questions
How long does it take to create a complete Amazon listing?
Creating a basic Amazon listing can take 2-4 hours if you’re doing everything yourself. However, professional quality listings require significantly more time. Comprehensive keyword research typically requires 2-3 hours. Meanwhile, writing optimized copy and creating professional images might take days or weeks. This depends on your skills and resources. Using services like FBA Creatives and Helium 10‘s AI tools reduces this timeline dramatically. You can potentially complete everything in a few hours plus processing time.
Do I really need to spend money on tools like Helium 10?
Technically, you can launch products without specialized tools. However, successful Amazon sellers almost universally use platforms like Helium 10. The data these tools provide is simply unavailable through manual research. Furthermore, the time saved on listing optimization pays for the subscription many times over. The 35% discount through travisarziani.com/helium10 makes the investment quite accessible. You can start with basic plans before upgrading as your business grows.
Can I change my listing after it goes live?
Yes, you can edit most listing elements after approval. This includes title, bullet points, description, images, and pricing. However, some changes trigger additional review periods. Making frequent major changes can temporarily suppress your rankings. Plan your listing carefully before launch. Nevertheless, don’t hesitate to optimize based on performance data. Split testing through Amazon’s Manage Your Experiments tool helps you improve systematically. It won’t risk your rankings.
What’s the difference between FBA and FBM for beginners?
FBM lets you launch immediately since you handle shipping yourself. This makes it ideal for testing products or launching quickly. Travis used this for his seven-day challenge. In contrast, FBA requires sending inventory to Amazon’s warehouses first. This adds 2-4 weeks to your timeline. However, it offers better scalability, Prime eligibility, and higher search rankings. Most successful sellers start with FBM. They transition to FBA once they’ve validated demand.
How important is Brand Registry for new sellers?
Brand Registry unlocks valuable features like A+ Content, brand analytics, and automated protection against hijackers. However, it requires a registered or pending trademark. This costs around $300 for DIY filing. You can launch successfully without Brand Registry initially. Nevertheless, plan to obtain it eventually if you’re building a serious brand. The restrictions are manageable. Your brand name must match your GS1 registration. Additionally, you’ll need photos showing your branding on the product.
How many keywords should I target in my listing?
Aim to incorporate 20-50 relevant keywords across your title, bullets, description, and backend search terms. Your title should contain 3-5 primary keywords. Each bullet point should target 2-4 additional keywords. Meanwhile, your backend search terms should capture synonyms and variations. Quality matters more than quantity. Ensure every keyword genuinely relates to your product. Use terms customers actually search.
Should I use AI to write my entire listing?
AI tools like Helium 10‘s Listing Builder provide excellent starting templates. They ensure keyword coverage. However, you should customize them with product-specific details, brand voice, and unique selling propositions. AI cannot know these things. Use AI to accelerate the process and ensure technical optimization. Nevertheless, add human insight about what makes your product special. Explain why customers should choose it over alternatives.
What if my listing gets stuck in review for more than four days?
Contact Seller Support through your Seller Central account. Do this if your listing remains under review beyond five business days. Provide your ASIN or product details. Politely request status updates. Sometimes listings get flagged for manual review. This happens due to category restrictions, keyword triggers, or random quality checks. Persistent but professional follow-up typically resolves delays. You’ll usually get resolution within a few additional days.


